1. Introduction
2.
Working with
Scenarist Pro
2.1. Creating a project
2.2. Geting
acquainted with the interface
2.3.
Importing data into the project
2.4.
Creating tracks in the project
2.4.1.
Creating tracks for video clips
2.4.2.
Creating chapters
(or scenes)
2.4.3. Creating menu
tracks
2.4.4.
Сreating the buttons in the menu
2.5.
The Scenario Editor
2.5.1.
Adding the tracks to the scenario
2.5.2.
Creating the connections
2.6.
Creating the DVD-disc files
3.0.
Conclusion
4.0. Inside Scenarist
NT
4.1.
Working with menus
4.1.1.
Menu design
4.1.1.1. Working with
the subpicture and buttons
4.1.1.1.2.
Image section
4.1.1.1.3.
Colors section
4.1.1.1.4.
Highlight section
4.1.1.1.5.
Buttons section
4.1.1.1.6. Advanced
Effects section
4.1.2.
Working with menus with several
levels
4.1.2.1.
Working with the
menu PGC
4.1.2.2. Title
Menu
4.1.2.3. Root Menu
4.1.2.4. Audio Menu
4.1.2.5.
PTT Menu (not translated yet)
4.1.2.6. Subpicture and Angle
Menu (not translated yet)
4.1.2.7.
Allowing/Prohibiting
viewer operations with PGC (by film) (not translated yet)
4.2.
Working in the Scenario Editor (not translated yet)
4.2.1. Creating a film from several fragments (not translated yet)
4.3. Creating subtitles (not translated yet)
4.3.1.
Importing subtitles from a script (not translated yet)
4.4.
Recording the DVD to disc (not translated yet)
1. Introduction
Scenarist
is a substantially more powerful program compared to ReelDVD. 90% of commercial
DVD discs are created with Scenarist. Amongst amateurs this program is
considerably less popular because of the widely-held opinion about the
difficulty of understanding and using Scenarist. This not an entirely
accurate opinion and we, in publishing this tutorial, hope to change this
opinion in the majority of amateur authors of DVD-video discs.
While testing ReelDVD,
we discovered several insignificant problems, all these problems were considered
insignificant, since we achieved the main objective: our disc plays on most
everyday players irrespective of the quality of disc onto which it is recorded,
our disc has the professional appearing menu. But nevertheless, the feeling remains, our disc is not completely
correct.
Sonic Scenarist Pro 2.7 will help us create a 100% correct disc.
We will assume that you already know how to use ReelDVD. These programs are similar, therefore we will not spend
time on the explanation of some concepts in this article, already described in
detail in other articles. This relates to menu creation, since the menus for ReelDVD and Scenarist are created the same way. We
will also assume that you have all
the necessary files for inclusion in the Scenarist project (scenario). We bring
to your
attention that text noted with the mark (!!!), is especially
important for understanding the workings of the program.
This guide has been translated (badly) from Russian. I have no understanding of
the actual language, all the work was done using the online translation site
WorldLingo Free Online Translator. If you have any comments or notes about
the wording of the guide please
contact me.
For any other comments please visit the original version
here and pass on your commments to the creators. The copyright of the guide
itself remains with them.
(!!!) -
we again focus your attention to the fact that without a basic knowledge of the
rules of creating subpictures and menus with subpictures described in detail in
other articles, reading this article is absolutely useless. We recommend you
become acquainted with DVD terms by reading the
DVD glossary. You should also become
acquainted with the creation of menus for DVD-Authoring programs.
Thus, let us create a DVD-video disc, containing the following:
FirstPlay (a clip which is played immediately after the disc is inserted into the player);
A Main menu (on this first menu, there will be the option between viewing the film and moving to the scene selection menu)
A Scene Selection Menu
The film itself
2. Working with Scenarist Pro.
2.1.
Creating a project.
After starting, the program
begins with the selection of the project:
In the Project Manager window, we press the New button.
This opens the Scenarist Project Wizard, and we press the Next button.
we press the ... button and indicate the name and location of the project file, then we press the Next button. The name can be anything you like.
In the following window we leave as the type of disc DVD-video and we press Next.
In the following window we leave as the type of disc Single Layer disc and we press Next.
We further establish the parameters of the coding the film: PAL (720 x 576), 4:3, and we press the Next button.
The following four windows are for the designation of the colours for the control buttons in the menu. We leave all values on default, i.e. press the Next button four times.
To the question: How many video title sets would you like? (how many films will be in the project), let us answer: one, i.e. we leave everything as is and will press the Next button.
In the following window we determine the place where the result (where we want to create the DVD-disc files) will be written. To do this press the ... button to the right of the Target field (point of destination) and select a folder (it is possible to use the same folder which you are using for this project). We press the Next button.
We won't use any templates, so select I don't want to use the template wizard, i.e. we press the Next button.
The parameters of this project are now completed. On this screen we see the result of our selections:
Scenario Name : MyFirstProject
disc type : DVD Video
Layer type : Single layer
Resolution : PAL
Aspect ratio : 4x3
Number of VTS : 1
Target directory : D:TempScenaristTest01
DVD Root directory : D:TempScenaristTest01
Now it just remains to press the Finish button.
2.2. Getting acquainted with the
interface
We have successfully completed creating the project and
entered into the Scenarist program. What we do see? The default view of the
program occupies the entire screen and consists of two windows:
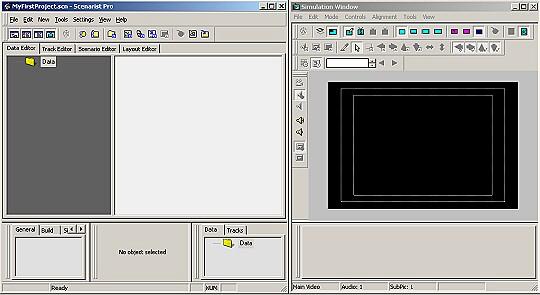
The left window is the scenario window, let us name it the
basic window. The right window contains a player for viewing clips, images,
texts and the finished result, let us name it the simulation window. If you did
not see this window using the command View/Simulation Window makes it possible
to see the simulation window on the screen.
The right window can be shut, and
then, if necessary, opened from the basic window. Closing the left window will
close the project. The Save function in Scenarist is absent - as the project is
always preserved, since all user actions are written in the project file project
immediately. That means to cancel an operation you must use Undo. Now here is
the basic window in more detail (from top to bottom, left to right):
The program menu: the usual collection of menus (File, Edit, New etc.)
The toolbar: here there are practically all the necessary buttons. The collection of buttons in the bar changes depending on the selection in the working window (see below).
the basic working window: basic work on the creation of your DVD-disc is conducted here.
Information window: information about errors and about the status of current processes is represented here, for example the process of the conversion of a wav file to AC3.
The property Window (property browser): this is the window for making changes to different parameters in the scenario, clips, menus etc.
Asset manager: it shows those files which you have introduced into the scenario.
In the simulation window there is:
The menu
The toolbar
The player window
The edit window: this window is a continuation of the properties window (from the basic window), different parameters of the film (in the basic menu) appear here, where it is possible to examine and change them.
2.3. Importing data into the project.
Let us first introduce the necessary data into our project. Data for the project
are video, audio files and image files. In our case there are two video files
and two audio files (we have FirstPlay and the film itself), and also four
images for creating the menu. We had prepared by a video program the files:
Introduction clip: FirstPlay.m2v and FirstPlay.wav
Film: Movie.m2v and Movie.wav
The way to create such files is described in detail elsewhere
on the internet. If you wish, for this tutorial you can download the following
small file.
Files for our menu creation
example (399 Kb):
First menu: Menu01.bmp (menu), Menu01_.sub.bmp (subpicture)
Second menu: Menu02.bmp (menu), Menu02_.sub.bmp (subpicture)
We want to make two usual (still) menus (not animated and
without sound).
Menu creation is described in other articles available on the
internet.
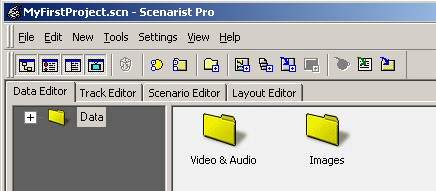
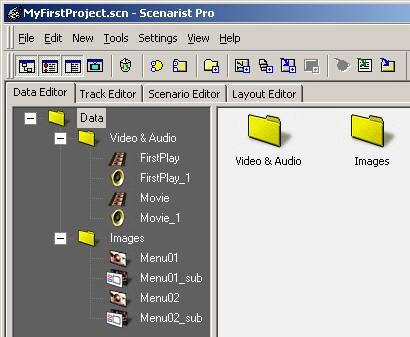
We now import data into the project:
In the working window press on the Data Editor tab (it is usually selected by default).
With the aid of the New Folder button
![]() create two folders,
with names Video & Audio and Images.
create two folders,
with names Video & Audio and Images.
By pressing the New Data button
![]() after opening the Video
& Audio folder, place into it the four files (FirstPlay.m2v, FirstPlay.wav,
Movie.m2v, Movie.wav). The video files will begin to be processed. Conversion
will be proposed for the audio files, in the pop-up window
after opening the Video
& Audio folder, place into it the four files (FirstPlay.m2v, FirstPlay.wav,
Movie.m2v, Movie.wav). The video files will begin to be processed. Conversion
will be proposed for the audio files, in the pop-up window
select AC3. If
in the future you want to convert all the sound into Dolby Digital (which we
recommend) then one should after selecting Ac -3 tick Apply to All. When more
files are introduced into the project, the program expends more time on their
conversion. The process of the file conversion is displayed in the information
window below.
Then, in the Images folder, using the New Data button
![]() ,
add the images necessary for the creation of the menus (Menu01.bmp,
Menu01_.sub.bmp, Menu01.bmp, Menu01_.sub.bmp). With the introduction of graphic
images the program will present the question
,
add the images necessary for the creation of the menus (Menu01.bmp,
Menu01_.sub.bmp, Menu01.bmp, Menu01_.sub.bmp). With the introduction of graphic
images the program will present the question
For the files Menu01.bmp and Menu02.bmp select Still Image, and for the files
Menu01_.sub.bmp and Menu02_.sub.bmp select Sub-Picture with Forced Start.
(!!!) -
with Subpicture with Forced Start the program understands this is a subpicture
for the menu, i.e. an image which the user will not be able to switch on/off.
With Subpicture without Forced Start the program understands this is a
subpicture image which user can switch on or off. A subpicture with this
attribute is usually used for the adding of subtitles.
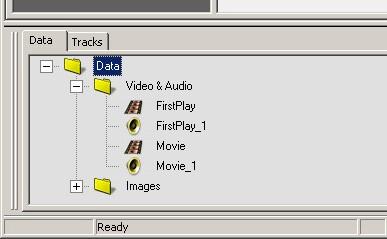
The data input into the project is now completed. The Data Editor tree now appears as follows:
2.4. Creating tracks in the project.
Let us start creating the tracks of the project. I.e. let us put together the
data objects (clips and menus) imported by us which will become our DVD-disc.
2.4.1.
Creating tracks for video clips.
We
make a track for First Play:
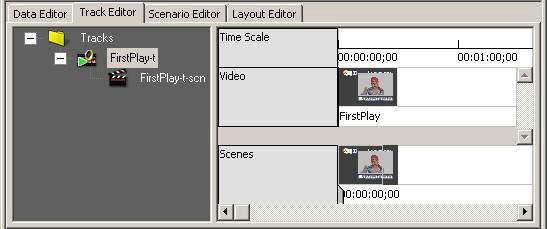
In the working window select the Track Editor tab:
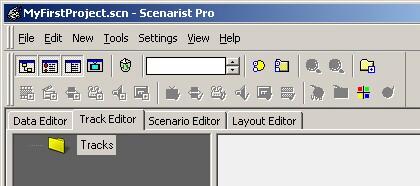
(notice the toolbar - it has changed, new buttons have appeared on it)
Using the Information Window and Property Browse buttons
![]() ,
turn off the information window and the properties window. Now only the asset
manager remains in the region of the screen under the working window (so it will
be more convenient):
,
turn off the information window and the properties window. Now only the asset
manager remains in the region of the screen under the working window (so it will
be more convenient):
Drag (using the mouse) the FirstPlay video from the asset manager
into the Track Editor window:
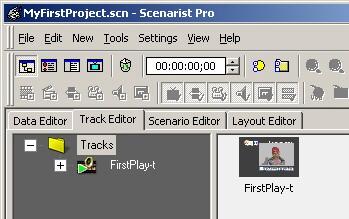
Click on the clip icon - the Track Editor window shows a more detailed view:
Transfer the FirstPlay audio from the asset manager into the area
under the Video (see figure above). The view in the Track Editor window will
change to the following:
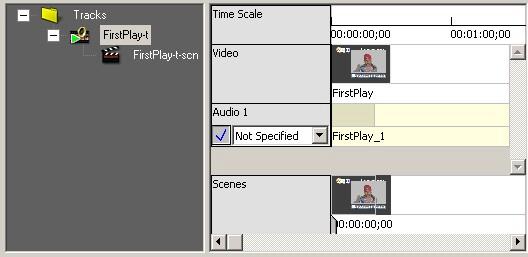
In the drop-down menu Audio 1 select the necessary language - in this case, English.
In the Track Editor folder tree select the root (marked Tracks), now we are ready to create the next track.
Repeat the operations described above for the Movie clip and add sound to it.
If in the process of creating the track you made some errors - remove the track and create it again. To remove a track select it in the folder tree and press the Delete key, or select Clear from the menu opened with the right button of the mouse.
2.4.2. Creating
chapters (or scenes).
It is best for chapters to be determined even in the process of
creating the film. This method will allow chapters to be easily set up
during the preparation of the DVD-disc. Scenarist is no exception to
the rule. All the more, in the Scenarist-A player (just as in ReelDVD)
the video can separate from the sound, therefore to arrange chapters
based on the sound is practically impossible.
In this example we will create three chapters (scenes) in the
film.
To create the chapters:
With the aid of the buttons on the toolbar open up the properties window and the simulation window. The simulation window - this the second half of Scenarist-A about which we mentioned in the beginning of article, but in the process of working it could become invisible. You may be most comfortable while working on the project to select the View/Always on Top command in the simulation window to keep it always visible.
In the working window select the Track Editor tab and then select the Movie- t track. Reduce the folder tree window as much as possible to increase the operating region in the Track Editor.
Click on the slider to the right of rectangle marked Scenes:
The first
chapter is set! The first chapter is always placed at the beginning of clip, it
cannot be removed or moved.
Move the slider on the clip, controlling image on the player in the simulation window, and stop at the place approximately corresponding to the second chapter of your film. For convenience it is possible to change scale the timeline with the + or - buttons on the toolbar.
Press the New Scene button
![]() on the toolbar
and a new scene (or Chapter) is created.
on the toolbar
and a new scene (or Chapter) is created.
Click in the region to the right and above the slider - the new
scene will be isolated, and below in the properties window the parameters of the
scene will be shown:
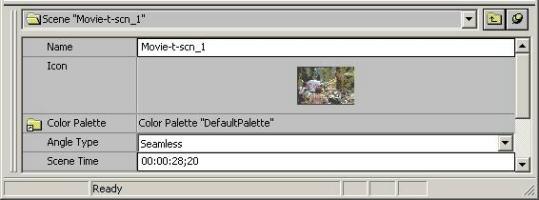
In the Name field one should introduce the name of scene, for example scene-2, and in the Scene Time field it is possible to type in the precise time of the beginning of scene, if it has been recorded by you earlier.
(!!!) - when giving names to scenes, and also to other scenario objects, it is only possible to use letters, numbers, the underline and the hyphen. Otherwise you will receive an error message at the disc generation stage.
To check the installation of the scene, double click on the icon of the scene and the image of the beginning of scene will appear in the player of the simulation window, corrected by the inputting of a precise value of the time of the beginning of the scene (if one was inputted).
The creation of the scene is completed. Thus you can create the remaining scenes of your film. For this example we made three scenes with the names: Scene-1, Scene-2 and Scene-3.
Note that we have changed the terminology: now we speak of scenes instead of chapters. Everything concerning Chapters in Scenarist are simply called Scenes. Now, using Scenarist, it is easier to call the components of the project as they are called in this program.
Return to my homepage.