Starting in this chapter, we will begin to look at additional aspects of the Scenarist NT program.
4.0. Inside
Scenarist NT
4.1. Working with
menus
4.1.1. Menu design
The fundamental rules of menu creation are discussed in sufficient detail in the article about ReelDVD. But there are a number of additional possibilities in menu design, which exist only in Scenarist and are absent from ReelDVD. It is these special features we will deal with in this chapter.
4.1.1.1.
Working with the subpicture and buttons
4.1.1.1.2. Image Section
For the menu editing select any menu with a subpicture in the Track Editor window and open the Simulation Window. Select the Subpicture and Highlight tab, and by using the drop-down menu or the buttons to the right select the Image section, as shown in the figure:
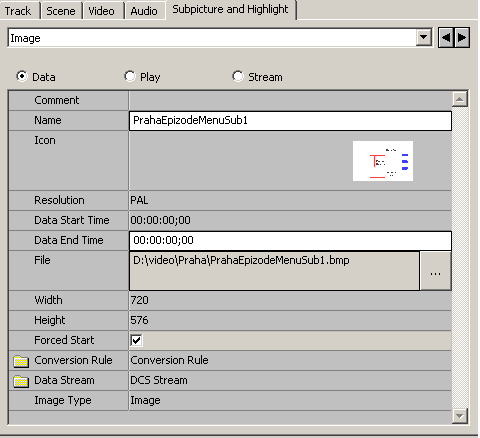
In the menu Image section it is possible to do the following:
change the name of the subpicture in the Name field
limit the time the subpicture spends on screen in the Data End Time field
(!!!) - this actually establishes the exact duration of
the subpicture on the screen, i.e. it is independent of the position of the
subpicture relative to the video. For example, if you enter in Data End Time
00:01:00;00, that subpicture will be on screen exactly 1 minute and if you move
it in the timeline 20 seconds to the right, that subpicture will be on the
screen from 20 seconds to 1 minute and 20 seconds.
(!!!) - do not forget after any shift of the subpicture with the menu, to
select the Highlight path and use the Align command in the right button menu of
the mouse. Otherwise you will receive an error message with any attempt of disc
generation, regardless of whether everything played normally in the simulation
window.
switch on/off Forced Start in the Forced Start field
replace one subpicture with another in the File field
4.1.1.1.3. Colors section
Again by using the drop-down menu or the buttons to the right select the Colors section:
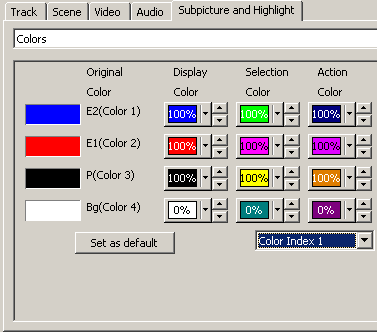
To the left the four primary colours of the subpicture, the to the right the menu colours determined by you, seen by the viewer. After double clicking by on any (in our example - on the red) of the primary colors to the left, we will see the color conversion control panel:
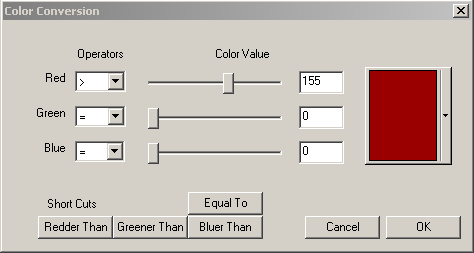
The use of this panel is that, for a subpicture you can create an image (or use a finished one) with an unlimited quantity of colours, but you will have to assign each of the primary colours in the Color Conversion panel. For this it is necessary to indicate the precise colour of red tone, for example, for the conversion in the red simple tone, or, by using the operator Redder Than, to tell the program, that everything which is redder than the color indicated is to be included. Manipulations with the red colour are given only for an example. With each of three primary colors it is possible to make also the very. By clicking on the down arrow to the right of the coloured rectangle, it is possible to select the required colour from the Windows palette, using the Other button...

In this menu there is one additional very pleasant possibility, which was not in ReelDVD - the creation of several palettes of subpicture colours. By changing the Color Index number in the drop-down menu in the lower right of the Colors window and tuning the palette for each Color Index, it's possible to use at least three different selection colours working with the buttons in one (!) menu. How to do this is written in the Buttons section.
4.1.1.1.4. Highlight section
Using the drop-down menu or the buttons to the right select the Highlight section:
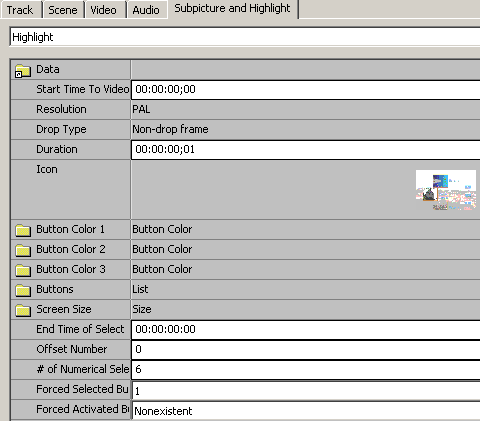
In this section the parameter we are interested in is the Forced Selected Button, in it is established the number of the button which will be selected in this menu after we first enter it. The number of button can be found in the upper left corner in the Scenarist outline of the button. If you want, so that with cyclic playback of the menu, the selected button would be last button selected, instead of the number of button we should select Nonexistent. This method has only one drawback - with the first entrance into the menu generally no button can be selected. We can work round this drawback - after selecting the PGC cell of the menu in the Scenario Editor, in the Simulation Window you can select the PGC Commands tab, and add the Pre command, Set Highlighted Button and assign the number of button which must be selected on the first entrance into the menu.
4.1.1.1.5. Buttons section
Using the drop-down menu or the buttons to the right select the Buttons section:

In this menu it is possible to look at and to change the
coordinates of any menu button, which may be necessary if the buttons are
arranged very close together, and it becomes difficult to outline the buttons by
mouse without overlapping. In addition to this, it is possible to switch on the
Auto Action attribute for any button. If we switch on this attribute for a
button, then upon selection of this button, the command connected with this
button will be immediately executed.
If you prepared different colour palettes in the
Colors section, then here you can indicate for each button your Color Index
and, therefore, change the selection colours of the buttons at will.
4.1.1.1.6. Advanced Effects section
Using the drop-down menu or the buttons to the right select the Advanced Effects section:
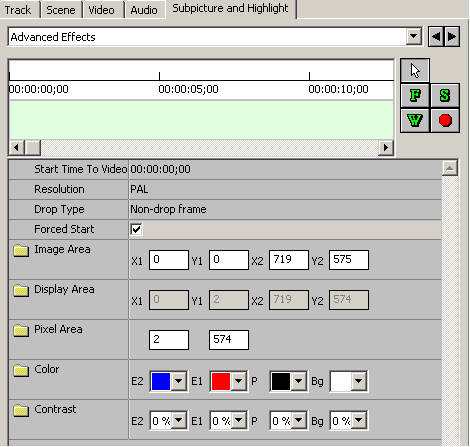
In this section it is possible to create effects for subpicture. Strictly speaking, these effects are intended only for subtitles, but it is also possible to use them for the menu (but the compatability of this has not been checked). In all it is possible to use 4 effects:
Fade (F) - a gradual change in the subpicture colours. In connection with the special features of the DVD players' colours, this will create a gradual, stepped variation in the colors, but not smooth, unfortunately.
Wipe (W) - smooth "wiping" of the subpicture on the screen.
Scroll (S) - moving the subpicture vertically on the screen.
Stop (red circle) - the curtailment of visibility of the subpicture on the screen.
Fade - gradual appearance of the subpicture on the screen.
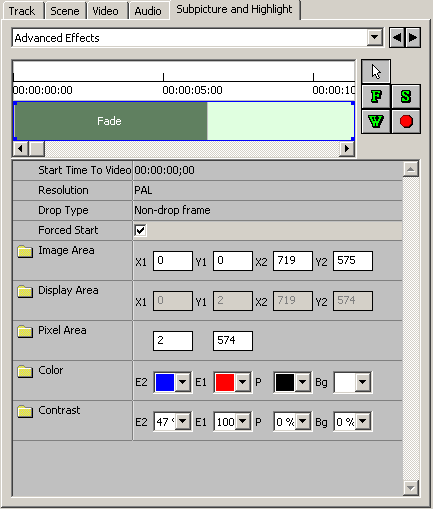
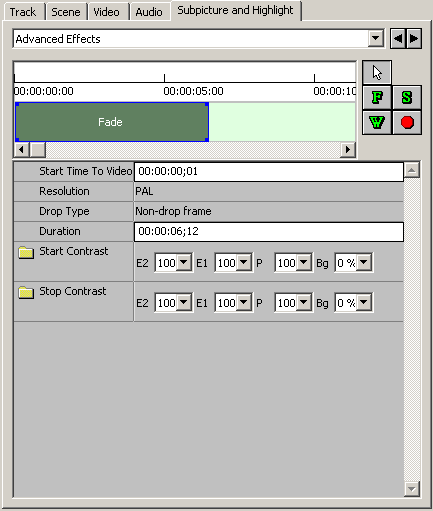
To apply the effect click and drag on the timeline in the Simulation Window across the region for the necessary duration, extending it or reducing it at the edges if necessary. If we click on the area in the timeline free from the effect, it is possible to establish the colours which will arise on the screen on the completion of the effect, as shown in figure above. But if we click on the green rectangle of the effect, it is possible (and necessary) to set the colours for the beginning of the effect and on its completion in the sections Start Contrast and Stop Contrast:
Wipe - smooth "wipe" of the subpicture.
To apply the effect click and drag on the timeline in the Simulation Window across the region for the necessary duration, extending it or reducing it at the edges if necessary. If we click on the area in the timeline free from the effect, it is possible to establish the colours which will arise on the screen on the completion of the effect, as shown in the first figure of the Fade effect description above. But if we click on the green rectangle of the effect, it is possible (and necessary) to set the colours for the beginning of the effect and on its completion in the sections Initial Color (colour in the beginning of the effect), Initial Contrast (contrast in the beginning of the effect), Change Contrast (contrast toward the end of the effect) and Change Color (colour toward the end of the effect):
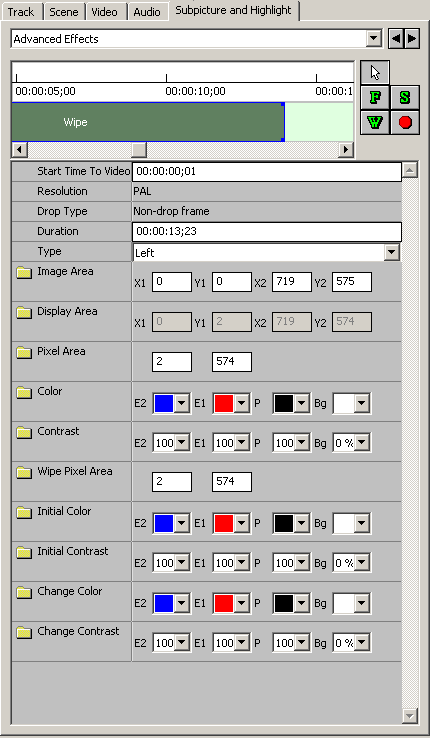
In this panel it is also possible to select the direction of the "wipe" to the left or to the right in the parameter Type - Left or Right.
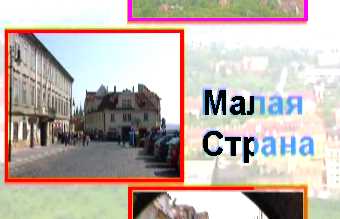
An example of the Wipe effect ("wipe" to the left):
Scroll - vertically moving the subpicture on the screen.
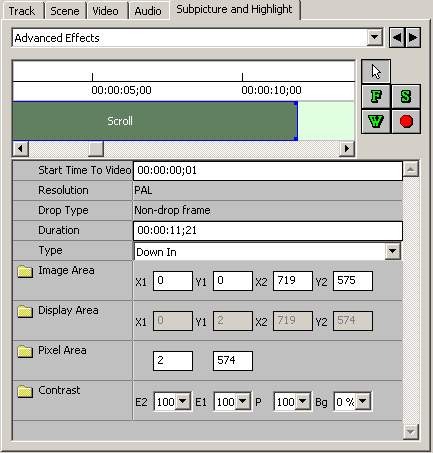
To apply the effect click and drag on the timeline in the Simulation Window across the region for the necessary duration, extending it or reducing it at the edges if necessary. If we click on the area in the timeline free from the effect, it is possible to establish the colours which will arise on the screen on the completion of the effect, as shown in the first figure of the Fade effect description above. In this effect it is possible to establish only the direction of motion for the subpicture in the parameter Type:
Down In - motion from top to bottom until it stops in the normal position
Down Out - motion from the normal position to the removal from the screen downward
Up In - just like Down In, but from bottom to top
Up Out - just like Down Out, but upward
Stop - this simply stops the subpicture. It has no variables. Although it has a separate region on the timeline, the duration of the effect does not have a value.
(!!!) - if you want to use the effects described above (besides Stop, which does not have limitations) on a menu subpicture, you should perform these operations:
To completely create the menu, i.e. to determine the buttons, create connections e.t.c.
To move in the Track Editor the highlight for this menu to the right by the arbitrary period.
To apply the desired effect to the menu
After selecting in the Track Editor the menu highlight, right click and select Align.
Starting from version 2.7 of this program, this error was discovered by the authors and now there is no possibility to apply these effects to the menu, but it is possible to use Stop as before.
4.1.2. Working with menus with several levels
in the majority of the cases with DVD disc creation it is necessary to have one main menu, from which you can move to the scene menu, set up the sound, language and so on. It is possible to organize all these menus by several methods:
Classic - the main menu is placed in the VideoManager and from there it is possible to pass to any place in the project, or more precisely - to any title in the project. Remaining menus are placed in the appropriate VTS. In this case the main menu is accessed by pushing the Title button on the DVD player remote, and the remaining menus by pushing the Menu button. This method is required if you plan to create a disc with several different films, each of which will be in their own VTS with their own menu, since only from the Title menu it is possible to move between VTS. There exist workarounds for this limitation, but they are extremely inconvenient and are not required. There is only one drawback in this technique - the user must understand, that by pressing the different buttons of the DVD player remote Title and Menu, they will go into different menus.
All the menus are placed together with the film in one VTS. This is the most frequently utilized method. It is convenient to have all the menus together and next to each other. In this case one menu is basic and is given the attribute Root Menu. The Root Menu is limited in that there can be only one language in the VTS. The remaining menus, as a rule, "are fastened" to the Root Menu and they do not have menu attributes. Their menu attributes are assigned differently from the usual way, more of which is described below in detail.
Let us examine in more detail both versions:
4.1.2.1. Working with the menu PGC
As an example for examining some of the possibilities of working with PGC we utilize the usual Title Menu.
The first rectangle of our menu in the Scenario Editor has the identifier PGC. If we select it with the mouse, we will see in the Property Browser this picture:
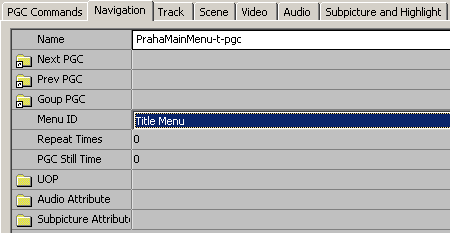
Here we can change the name of the PGC. You will note that this will change only the name of the first cell of the PGC and the remaining cells will preserve their names. This is done consciously, as the name belongs to each PGC cell independently. In this case you cannot change the Menu ID. This section of the PGC properties is interesting as it gives us the possibility to see designations of such PGC commands as Next PGC, Prev PGC And Goup PGC. We will not look at them in detail now, but it is desirable to put it in the back your mind where it is possible to see the values of these commands. If in the Simulation Window we select the PGC Command tab, we will approximately see this menu:
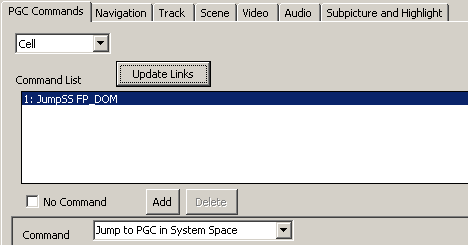
This menu can prove very useful in working further on the project. In it it is possible to see and to change commands for our Title menu. For example, if you connected the Cell cell with any element of your project, it is only possible to remove that link here, by replacing the command Jump to PGC in System Space to No Operation. The same can be made with the Pre and Post passages, by selecting the necessary type in the descending menu under the PGC Commands tab. Since we began to mention some PGC commands, let us describe them briefly:
Pre - a command that is carried out before the PGC is reproduced. In other words, by connecting the Pre PGC flag with another object, we can exclude the playback of this PGC.
Post - a command that is carried out after the PGC has played back. By connecting Post to the beginning of the PGC itself (bo this by clicking with the mouse on Post, dragging and letting go when the mouse is in any place of the first rectangle of the PGC), we will obtain, for example, a "loop", i.e. infinite playback of the PGC.
Cell - is practically equivalent to Post, but only for one cell PGC. In this case this one and the same, but if cells several (then will be, for example, in the film, broken to chapters), the this will be far from one and the same. Any connection Cell with any object of project indicates unconditional transfer to this object on the completion of playback Cell.
After selecting the Video tab, we will see:
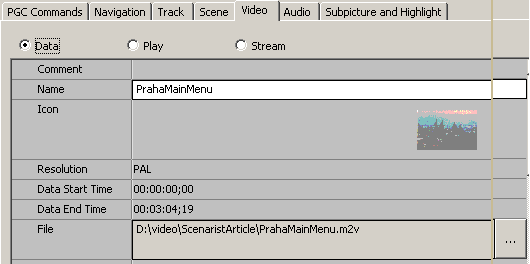
The most useful use of this section of the PGC properties - is the possibility of replacing the menu video file. After pressing the ... button in the File line we always can replace the video file, without changing anything else in the concrete menu or in the scenario as a whole. Looking forward, it is handy to note that this is the only method of replacing the video file in all forms of Scenarist objects. Since the description of working with Subpicture is in a separate section, for now we will pass on the description of the Subpicture and Highlight menu tab.
We continue with the examination of PGC elements as a whole and the Title menu in particular. The Program cell can be passed completely, and we will look in greater detail on the following cell with the same name (Cell). Cell itself has two flags - NSM and Cell. This indicates the Cell flag, we explained above - let us recall, that after connecting the Cell flag with any other permissible scenario object, we create an unconditional transfer to this object on the completion of the playback of our cell. NSM means Non-SeaMless, i.e. intermittent. All cells of a Scenarist project can have a flag as NSM or SM - Seamless, i.e. continuous. The NSM Flag is applied automatically to all single cells, and also to any cell in the sequence, before which there is a passage to another object from the previous cell. Let us explain based on an example. In the figure you see the chapters of film and they all they have a flag SM:
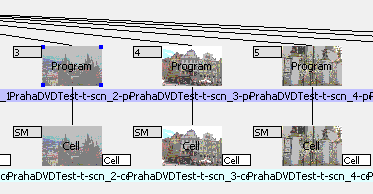
But if we connect one of the cells to another object, the picture changes:
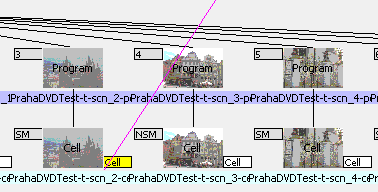
The following Cell receives the flag NSM (Not Seamlessly - not continuous). The purpose of this flag to a large degree is information and actually indicates, that the fulfillment of any command during playback of the DVD-video disk can give (but it can and not give) pause in this playback. After the selection of the Cell cell it is interesting to note the Navigation tab in the Simulation Window:
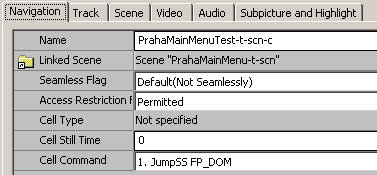
Besides the already mentioned Seamless parameter, it can prove useful to note the Cell Command parameter, since it is only here we can remove any command incorrectly created for a Cell. For this you need to select in the drop-down menu No Command.
The following PGC cell - Buttons. To it "are assigned" the function of all menu buttons. This cell is always absent from all non-menu PGC. After the selection of this cell in the Simulation Window the new tab appears:
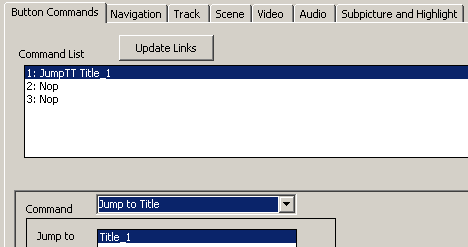
Here it is possible to:
Designate to each button commands, including those which cannot be created by the simple connection of objects, such as the selection of audio tracks, for example. The Command menu assigns the type of command, the window below serves for the more detailed description of the command.
Remove any command from any button by selecting No Operation in the drop-down menu.
Set the parameters of the selection of soundtrack, camera and subtitles, and also the fulfillment of passage by satisfying the specified conditions. About these possibilities we will describe later.
Certainly, in the majority of the cases, in this tab you will see the results of the connections of the menu buttons constructed by you with other scenario objects of the disk, which, naturally, are also commands.
4.1.2.2. Title Menu
After the loading of the program and passage into the scenarios screen we always see the same picture:
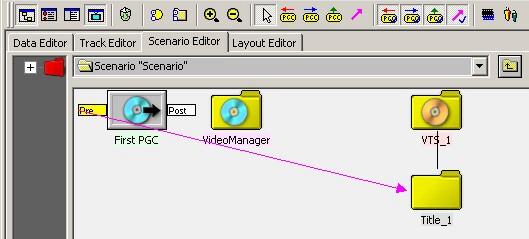
Before adding into the project the main (Title) menu, it is necessary to determine the language which this menu will be in.
Thus, we add a language using the command Add/Language:

Then we add the menu to the VMG (here and throughout we will assume that you are familiar as with ReelDVD, so you are preliminarily prepared and introduced into the program):

Obviously, you already may have noticed,
that the elements of the Title menu in essence are different in no way from the
elements of any another PGC project. Since PGC was examined
in detail above, we will not cover it again.
Naturally, the Menu ID for Title Menu will be - Title Menu. This Menu is the
main thing on the disk - it is only from here that it is possible to access the
different VTS and/or the different
Root Menus in limits of one
VTS. But, since the overwhelming
majority of amateur films and the majority of commercial do not use several
VTS, and menus in different
languages are usually created as menus inside one Root
Menu, the Title Menu is not used. This method is also convenient that the
viewer always reaches one menu, regardless of what button on the panel with the
word Menu they pressed.
So, in order "to go around" the Title Menu, it is sufficient
to join to the language icon of the Title Menu any graphic file as the menu, and
then to connect the Pre flag of the menu with the Root
Menu. After this, the call of any menu will lead to the
Root Menu.
Return to my homepage.