2.4.3. Creating menu tracks
Now we will create tracks for the menus. As has already been
said above, we decided to make the two most common (still) menus - the
main menu of the disc and a menu for the selection of scenes.
The main menu of our example contains two options:
View the film
Select a scene
The select a scene menu contains four options:
Scene-1
Scene-2
Scene-3
Return to main menu
Thus, we make the menu:
With the aid of the buttons on the toolbar we turn off the properties window and we add the asset manager
In the working window we select the Track Editor tab (it should already be selected), expand the folder tree window to it's initial width, and click on the root of the tree (marked Track).
From the asset manager we drag over Menu01 into the Track Editor and we select Still Menu.
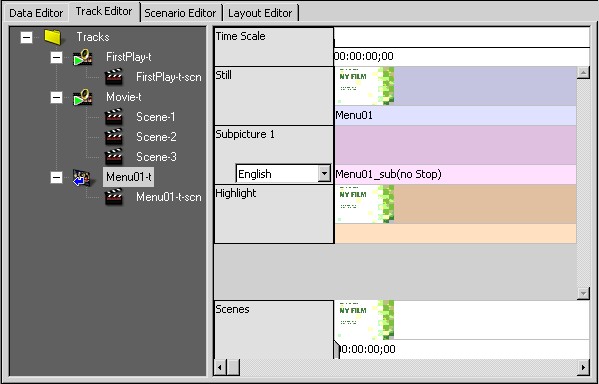
In the Track Editor window double click on the new clip Menu01- t.
Transfer Menu01_sub into the rectangle marked Still.
Change Not Specified (in the rectangle marked Subpicture 1) to
English.
As a result of all these actions the Track Editor window should appear thus:
2.4.4. Сreating the buttons in the
menu.
We move into the simulation window and perform
the following operations:
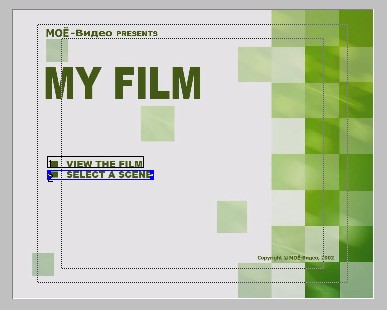
Using the New Button icon
![]() sketch buttons onto the
image of the menu:
sketch buttons onto the
image of the menu:
In the editing window (under the player window) click on the Subpicture and Highlight tab.
You should be in the Subpicture Colors section:
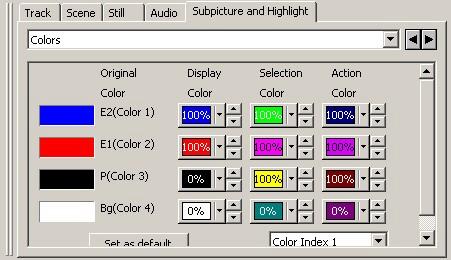
We establish values for the black colour (we only used black colour during the creation of the subpicture Menu01_.sub.bmp):
Display Color - 0%
Selection Color - yellow
Action Color - dark red
With the aid of the buttons in the toolbar of the simulation window arrange the menu cursor movement directions for the DVD player controls. The different version: in the menu of the simulation window, in Tools select Auto Route - this it will automatically arrange the directions. One should note that the automatic option does not possess acceptable intellect and it normally arranges directions only during the simple (square-cluster) arrangement of buttons.
Check the menu is working. For this press the Software
Simulation button ![]() in
toolbar of the simulation window, then press the Play button. Dark-blue pointers
(to the left, to the right, upward and downward) in the player screen emulate
the pointers of the control panel of a DVD player.
in
toolbar of the simulation window, then press the Play button. Dark-blue pointers
(to the left, to the right, upward and downward) in the player screen emulate
the pointers of the control panel of a DVD player.
To switch off the player and return to editing press the Design Mode
button ![]() .
.
This completes the menu creation. Similarly create the second menu, using the files Menu02.bmp, Menu02_sub.bmp.
2.5. The Scenario Editor
We have added the data, prepared the tracks, now everything is ready for
creating the scenario of the future DVD-disc.
2.5.1.
Adding the tracks to the scenario
Press on the Scenario Editor tab in the working window.
Enlarge the basic area of the window by decreasing the scenario tree window:

As you can see - the scenario is almost ready, there only
remains to place our tracks into the necessary places and arrange the
connections.
With the aid of buttons in the toolbar open the asset manager and press in it the Track tab.
Drag over FirstPlay-t from the asset manager to the Title_1 icon.
Click on the VideoManager icon. In the New menu select Language (or Add Language... from the right button menu) and in the pop-up window select English.
Drag over Menu01-t from the asset manager to the newly created English icon.
Select the VTS_1 icon. In the New menu select Language (or Add
Language... from the right button menu) and in the pop-up window select English,
(if you can't see the new English icon, use the scroll bars to find it),
drag over Menu02- t from the asset manager to this recently created English icon
(the new icon which grows from VTS_1).
Click on the icon VTS_1. In the New menu select Title (or select Add Title... from
the right button menu), leave the proposed name Title_2 (if you can't see the
new Title_2 icon, use the scroll bars to find it)
drag over Movie- t
from the asset manager to the recently created icon Title_2.
2.5.2. Creating the connections
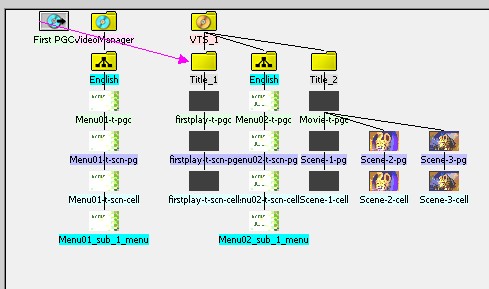
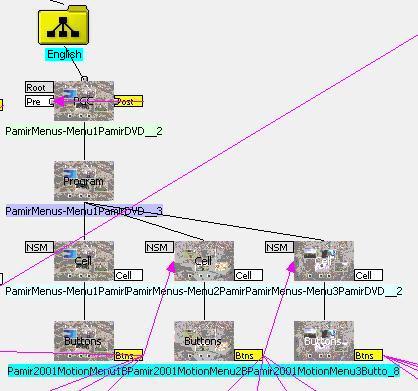
After adding all our tracks into the Scenario Editor window, it should appear
approximately like this:
If all paths of project are not visible, select "-" on the toolbar for changing the scale of the image.
(!!!) - In our example, as you see, there are only two menus - Title (Menu01), is always joined to VideoManager/Language and Root (Menu02), which in turn is always joined to VTS/Language. The language in our example is English. If your Root menu consists of several menus, then they all (except the first) must be dragged over to the Program cell of the first menu from the Tracks folder. This cell is 2nd from the top. If you want, so that all menus would be come from the Title menu, then all menus, besides the first, must be dragged over to the Program cell of the Title menu. Thus, for example, this is how several menus from the Root tree would appear:
It only remains to arrange the connections between the components of the project. Look to the figure (above). We have the basic (upper level) icons:
First PGC - which indicates that clip which is played straight after the DVD-disc is loaded into the player.
Video Manager - container for the upper level menu, i.e. Title.
VTS_1 - container for the film and those clips which can be
connected with it.
One connection in our scenario already exists: from First PGC to Title_1. This connection indicates, that after loading (start) the DVD-disc will follow our path to FirstPlay-t.
Let us arrange the remaining connections:
First from the main menu to the film. For this find the
rectangle with the text Btns on the icon Menu01_.sub_1_.menu (this icon is
located below on the tree growing from the Video Manager icon):
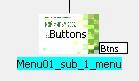
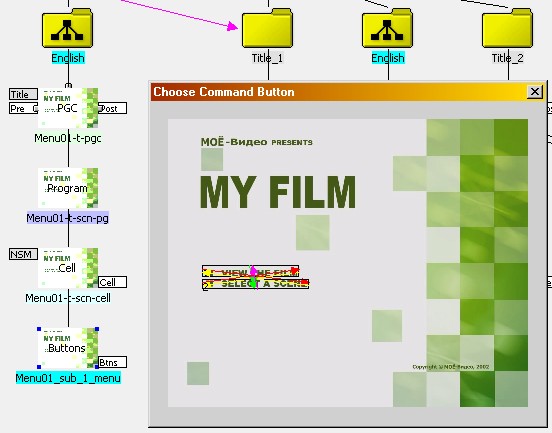
Click and drag the mouse from there to the Title_2 icon (it is located to the right and above, if this is not convenient to make then enlarge the basic window). If you release the mouse on the Title_2 icon, then the "Choose Command Button" window will appear on the screen. Select the first button.
Draw a connection from the rectangle with the text Btns on the
Menu01_.sub_1_.menu icon (from there, from where they stretched before this) to
the Menu02-t-pgc icon (i.e. to the path of the second menu):

In the pop-up window "Choose Command Button" select the second button.
You may have noticed that the connections between the menus do not show in the scenarios editor! To check the created connections open the simulation window, having already selected the cell of menu with flag Btns. Click on the Button Commands tab in the edit window. In it the list of your connections will appear.
Let us make the connections from the second menu (the Menu02_.sub_1_.menu icon) to the scenes of our film. For this we consecutively draw connections from the rectangle with the text Btns on the Menu02_.sub_1_.menu icon to the episode -1, Episode -2, Episode -3 icons and to the Menu01-t-pgc icon (to connect "return to the main menu" do not forget about that, as the connections on the menu are not reversible) and for how to verify the connections, read the preceding point.
Lastly, create a connection from First Play to the main menu (as in our example, but it is possible to connect to the basic film, if preferred).
Draw a connection from the rectangle with text Post on the FirstPlay-t-pgc icon to the Menu01-t-pgc icon (i.e. to the first menu). These connections also are not mapped in the Scenario Editor, so to verify them, open the simulation window, in the editing window click on the PGC Commands tab, in the collapsible menu select Post. This command appears as follows: CallSS RSM=1, (this indicates that the connection is written correctly).
(!!!) - Commands Post and Pre are not equivalent to the commands Next and Previous on the control panel of players.
It is time to check your disc is working. To do this:
Select the First PGC icon.
In the toolbar of the simulation window press the Software Simulation button, then the Play button. Dark-blue pointers below (left, right, up and down) simulate the pointers of the control panel of DVD players.
2.6. Creating the DVD-disc files
Click on the Layout Editor tab in the working window.
In the window that appears, in the area Step 3 – Choose Operations and Press Start tick the first box Create DVD Video.
Check (in Step 2 above) the DVD Root Directory field. In this folder the files of your DVD-disc will be created.
Open the information window (with the Information Window button in the toolbar) to see the progress of the disc creation.
Press the Start button.
The resulting DVD-disc files can be examined with the aid of a DVD-player program, PowerDVD for example.
3.0. Conclusion
Despite the fact that Scenarist sees DVD-R recorders, we cannot recommend recording to disc with the aid of Scenarist for one simple reason - we did not check this option during the writing of this tutorial. Use the tried and tested method: burn the disc with the aid of programs like VOB Instant CD+.DVD, Nero Burning ROM (only after forbidding Joliet in Nero) or any other program which you use for recording DVD-discs. For more details about recording Scenarist DVD-video to disc, it is possible to read here.
Return to my homepage.